2. Install the wallet app
3. Sign up for an account with the wallet app
4. Create one or more accounts | 1. N/A
2. The app is installed
3. I have an account
4. I have one or more accounts | | **Connect to dapp via web browser** | 1. Open the Reown connection page [https://appkit-lab.reown.com/](https://appkit-lab.reown.com/) from a PC
2. Press on the “Connect Wallet” button and select the Reown option.
3. Open the wallet app and use the scan QR option to connect.
4. Accept on the wallet the connection request | 1. The app has been correctly set-up
2. A modal with wallet options is opened
3. A QR code is shown on the website and the wallet is able to scan it.
4. The connection is successfully established. The wallet data is now shown on the website. | | **Connect to dapp via mobile browser (Deep-link)** | 1. Open [https://appkit-lab.reown.com/](https://appkit-lab.reown.com/) in your mobile device.
2. Select one of the default options (e.g. Wagmi for EVM chains). Press the "Custom Wallet" button from the navbar. Fill in the wallet’s name and its deeplink (Mobile Link) in the “Add a Custom Wallet” form. Press “Add Wallet”. After the website reloads, press the “Connect Wallet” button and select the newly created wallet.
3. Accept the connection request in the wallet application. | 1. N/A
2. A form should show up on the website to fill in the wallet’s data. After the changes are applied, the modal should show the newly created wallet on the main view.
3. The user should be redirected to the wallet application and a modal with a connection request should show up on the wallet application. The wallet should connect successfully. On Android devices, the user should be redirected back to the website after accepting the connection request. | | **Switch chains - dapp side** | 1. Once the wallet is connected, press on the modal button on the top right of the website.
2. Press the first button of the modal to switch the chain.
3. Select any available chain, close the modal, and press the “Send Transaction” button | 1. A modal with the account information should pop up on the website.
2. A new view with supported chains should show up.
3. The transaction request that pops up on the wallet should show in their information the correct chain that was previously selected. | | **Switch Chains - wallet side (if supported)** | 1. Check if the wallet supports chain switching. If so, select a different chain from the connected one. | 1. The chain change should be reflected on the website. The first card shows the current chain ID. | | **Accounts Switching - wallet side** | 1. In the wallet app, switch from one account to another. | 1. The account switch event should be reflected in the modal’s account view on the website. | | **Disconnect a wallet** | 1. Select the "Disconnect" button from the Wallet App (Ideally, wallets should have a section where users can see all their existing dApp connections and manage/disconnect from dApps in one spot—this is not always true, so if not possible, just skip this).
2. Repeat the above steps and press the "Disconnect" button from the dApp (this should always be available). | 1. The related session should disappear from the dApp and the Wallet App.
2. The related session should disappear from the dApp and the Wallet App. | | **Verify API** | 1. Open [https://malicious-app-verify-simulation.vercel.app/](https://malicious-app-verify-simulation.vercel.app/)
2. Select a supported chain by the wallet (some wallets don’t support testnets) and press the “Connect” button.
3. Scan with the wallet the generated QR code. | 1. N/A
2. A modal should show up with a QR code to scan.
3. The connection request in the wallet should flag the website as malicious. | ### Chain Specific The following test cases only apply for wallets supporting a particular set of chains.
2. Press the “Sign Message” button.
3. Accept the signature request on the wallet. | 1. N/A
2. A modal should pop up on the wallet app requesting a signature.
3. Once accepted and signed, the hash should show up on the website. | | **Supporting eth\_signTypedData\_v4** | 1. Connect the wallet.
2. Press the “Sign Typed Data” button.
3. Accept the signature request on the wallet. | 1. N/A
2. A modal should pop up on the wallet app requesting a signature.
3. Once accepted and signed, the hash should show up on the website. | | **Supporting eth\_sendTransaction** | 1. Connect the wallet.
2. Press the “Send Transaction” button. | 1. N/A
2. A modal should pop up on the wallet app requesting a signature. |
2. Press the “Sign Message” button.
3. Accept the signature request on the wallet. | 1. N/A
2. A modal should pop up on the wallet app requesting a signature.
3. Once accepted and signed, the hash should show up on the website. | | **Supporting solana\_signTransaction** | 1. Connect the wallet to [AppKit Lab](https://appkit-lab.reown.com/library/solana)
2. Press the “Sign Transaction” button.
3. Accept the signature request on the wallet. | 1. N/A
2. A modal should pop up on the wallet app requesting a signature.
3. Once accepted and signed, the hash should show up on the website. | | **Supporting v0 Transactions** | 1. Connect the wallet to [AppKit Lab](https://appkit-lab.reown.com/library/solana)
2. Press the “Sign Versioned Transaction” button.
3. Accept the signature request on the wallet. | 1. N/A
2. A modal should pop up on the wallet app requesting a signature.
3. Once accepted and signed, the hash should show up on the website. |
2. Install the wallet app
3. Sign up for an account with the wallet app
4. Create one or more accounts | 1. N/A
2. The app is installed
3. I have an account
4. I have one or more accounts | | **Connect to dapp via web browser** | 1. Open the Reown connection page [https://appkit-lab.reown.com/](https://appkit-lab.reown.com/) from a PC
2. Press on the “Connect Wallet” button and select the Reown option.
3. Open the wallet app and use the scan QR option to connect.
4. Accept on the wallet the connection request | 1. The app has been correctly set-up
2. A modal with wallet options is opened
3. A QR code is shown on the website and the wallet is able to scan it.
4. The connection is successfully established. The wallet data is now shown on the website. | | **Connect to dapp via mobile browser (Deep-link)** | 1. Open [https://appkit-lab.reown.com/](https://appkit-lab.reown.com/) in your mobile device.
2. Select one of the default options (e.g. Wagmi for EVM chains). Press the "Custom Wallet" button from the navbar. Fill in the wallet’s name and its deeplink (Mobile Link) in the “Add a Custom Wallet” form. Press “Add Wallet”. After the website reloads, press the “Connect Wallet” button and select the newly created wallet.
3. Accept the connection request in the wallet application. | 1. N/A
2. A form should show up on the website to fill in the wallet’s data. After the changes are applied, the modal should show the newly created wallet on the main view.
3. The user should be redirected to the wallet application and a modal with a connection request should show up on the wallet application. The wallet should connect successfully. On Android devices, the user should be redirected back to the website after accepting the connection request. | | **Switch chains - dapp side** | 1. Once the wallet is connected, press on the modal button on the top right of the website.
2. Press the first button of the modal to switch the chain.
3. Select any available chain, close the modal, and press the “Send Transaction” button | 1. A modal with the account information should pop up on the website.
2. A new view with supported chains should show up.
3. The transaction request that pops up on the wallet should show in their information the correct chain that was previously selected. | | **Switch Chains - wallet side (if supported)** | 1. Check if the wallet supports chain switching. If so, select a different chain from the connected one. | 1. The chain change should be reflected on the website. The first card shows the current chain ID. | | **Accounts Switching - wallet side** | 1. In the wallet app, switch from one account to another. | 1. The account switch event should be reflected in the modal’s account view on the website. | | **Disconnect a wallet** | 1. Select the "Disconnect" button from the Wallet App (Ideally, wallets should have a section where users can see all their existing dApp connections and manage/disconnect from dApps in one spot—this is not always true, so if not possible, just skip this).
2. Repeat the above steps and press the "Disconnect" button from the dApp (this should always be available). | 1. The related session should disappear from the dApp and the Wallet App.
2. The related session should disappear from the dApp and the Wallet App. | | **Verify API** | 1. Open [https://malicious-app-verify-simulation.vercel.app/](https://malicious-app-verify-simulation.vercel.app/)
2. Select a supported chain by the wallet (some wallets don’t support testnets) and press the “Connect” button.
3. Scan with the wallet the generated QR code. | 1. N/A
2. A modal should show up with a QR code to scan.
3. The connection request in the wallet should flag the website as malicious. | ### Chain Specific The following test cases only apply for wallets supporting a particular set of chains.
2. Press the “Sign Message” button.
3. Accept the signature request on the wallet. | 1. N/A
2. A modal should pop up on the wallet app requesting a signature.
3. Once accepted and signed, the hash should show up on the website. | | **Supporting eth\_signTypedData\_v4** | 1. Connect the wallet.
2. Press the “Sign Typed Data” button.
3. Accept the signature request on the wallet. | 1. N/A
2. A modal should pop up on the wallet app requesting a signature.
3. Once accepted and signed, the hash should show up on the website. | | **Supporting eth\_sendTransaction** | 1. Connect the wallet.
2. Press the “Send Transaction” button. | 1. N/A
2. A modal should pop up on the wallet app requesting a signature. |
2. Press the “Sign Message” button.
3. Accept the signature request on the wallet. | 1. N/A
2. A modal should pop up on the wallet app requesting a signature.
3. Once accepted and signed, the hash should show up on the website. | | **Supporting solana\_signTransaction** | 1. Connect the wallet to [AppKit Lab](https://appkit-lab.reown.com/library/solana)
2. Press the “Sign Transaction” button.
3. Accept the signature request on the wallet. | 1. N/A
2. A modal should pop up on the wallet app requesting a signature.
3. Once accepted and signed, the hash should show up on the website. | | **Supporting v0 Transactions** | 1. Connect the wallet to [AppKit Lab](https://appkit-lab.reown.com/library/solana)
2. Press the “Sign Versioned Transaction” button.
3. Accept the signature request on the wallet. | 1. N/A
2. A modal should pop up on the wallet app requesting a signature.
3. Once accepted and signed, the hash should show up on the website. |
* `transaction` : `String` - base64-encoded serialized transaction
* **\[deprecated]** `feePayer` : `String | undefined` - public key of the transaction fee payer
* **\[deprecated]** `instructions` : `Array` of `Object` or `undefined` - instructions to be atomically executed:
* `Object` - instruction
* `programId` : `String` - public key of the on chain program
* `data` : `String | undefined` - encoded calldata for instruction
* `keys` : `Array` of `Object` - account metadata used to define instructions
* `Object` - key
* `isSigner` : `Boolean` - true if an instruction requires a transaction signature matching `pubkey`
* `isWritable` : `Boolean` - true if the `pubkey` can be loaded as a read-write account
* `pubkey` : `String` - public key of authorized program
* **\[deprecated]** `recentBlockhash` : `String | undefined` - a recent blockhash
* **\[deprecated]** `signatures` : `Array` of `Object` or `undefined` - (optional) previous partial signatures for this instruction set
* `Object` - partial signature
* `pubkey` : `String` - pubkey of the signer
* `signature` : `String` - signature matching `pubkey`
### Returns `Object`: * `signature`: `String` - corresponding signature for signed instructions * `transaction`?: `String | undefined` - optional: base64-encoded serialized transaction ### Example ```typescript theme={null} theme={null} // Request { "id": 1, "jsonrpc": "2.0", "method": "solana_signTransaction", "params": { "feePayer": "AqP3MyNwDP4L1GJKYhzmaAUdrjzpqJUZjahM7kHpgavm", "instructions": [{ "programId": "Vote111111111111111111111111111111111111111", "data": "37u9WtQpcm6ULa3VtWDFAWoQc1hUvybPrA3dtx99tgHvvcE7pKRZjuGmn7VX2tC3JmYDYGG7", "keys": [{ "isSigner": true, "isWritable": true, "pubkey": "AqP3MyNwDP4L1GJKYhzmaAUdrjzpqJUZjahM7kHpgavm" }] }], "recentBlockhash": "2bUz6wu3axM8cDDncLB5chWuZaoscSjnoMD2nVvC1swe", "signatures": [{ "pubkey": "AqP3MyNwDP4L1GJKYhzmaAUdrjzpqJUZjahM7kHpgavm", "signature": "2Lb1KQHWfbV3pWMqXZveFWqneSyhH95YsgCENRWnArSkLydjN1M42oB82zSd6BBdGkM9pE6sQLQf1gyBh8KWM2c4" }], "transaction": "r32f2..FD33r" } } // Result { "id": 1, "jsonrpc": "2.0", "result": { signature: "2Lb1KQHWfbV3pWMqXZveFWqneSyhH95YsgCENRWnArSkLydjN1M42oB82zSd6BBdGkM9pE6sQLQf1gyBh8KWM2c4" } } ``` ## solana\_signAllTransactions This method is responsible for signing a list of transactions. The wallet must sign all transactions and return the signed transactions in the same order as received. Wallets must sign all transactions or return an error if it is not possible to sign any of them. ### Parameters `Object` - Signing parameters: * `transactions` : `String[]` - base64-encoded serialized list of transactions
### Returns `Object`: * `transactions` : `String[]` - base64-encoded serialized list of signed transactions in the same order as received
### Example ```typescript theme={null} theme={null} // Request { "id": 1, "jsonrpc": "2.0", "method": "solana_signAllTransactions", "params": { "transactions": string[] } } // Response { "id": 1, "jsonrpc": "2.0", "result": { "transactions": string[] } } ``` ## solana\_signAndSendTransaction This method is responsible for signing and sending a transaction to the Solana network. The wallet must sent the transaction and return the signature that can be used as a transaction id. ### Parameters `Object` - transaction and options:
* `transaction` : `String` - the whole transaction serialized and encoded with base64
* `sendOptions` : `Object` - options for sending the transaction
* `skipPreflight` : `Boolean` - skip preflight checks
* `preflightCommitment` : `'processed' | 'confirmed' | 'finalized' | 'recent' | 'single' | 'singleGossip' | 'root' | 'max'` - preflight commitment level
* `maxRetries` : `Number` - maximum number of retries
* `minContextSlot` : `Number` - minimum context slot
### Returns `Object`: * `signature` : `String`, - the signature of the transaction encoded with base58 used as transaction id
### Example ```typescript theme={null} theme={null} // Request { "id": 1, "jsonrpc": "2.0", "method": "solana_signAndSendTransaction", "params": { "transaction": string, "sendOptions": { "skipPreflight"?: boolean, "preflightCommitment"?: 'processed' | 'confirmed' | 'finalized' | 'recent' | 'single' | 'singleGossip' | 'root' | 'max', "maxRetries"?: number, "minContextSlot"?: number, } } } // Response { "id": 1, "jsonrpc": "2.0", "result": { "signature": string } } ``` # Stacks Source: https://docs.walletconnect.com/wallets/chains/stacks Overview of the Stacks JSON-RPC methods supported by Wallet SDK. These are the methods that wallets should implement to handle Stacks transfers and messages via WalletConnect. ## Core Methods (common) ### stx\_getAddresses Retrieve active account addresses; primarily Stacks-focused. #### Request ```json theme={null} { "id": 1, "jsonrpc": "2.0", "method": "stx_getAddresses", "params": {} } ``` #### Response ```json theme={null} { "jsonrpc": "2.0", "id": 1, "result": { "addresses": [ { "symbol": "STX", "address": "SP…" } ] } } ``` **Notes:** * Use this first to select the wallet's active address. * Filter on `symbol: "STX"` or by address prefix (SP for mainnet, ST for testnet). ## Stacks Methods ### stx\_transferStx Transfer STX. #### Request ```json theme={null} { "id": 1, "jsonrpc": "2.0", "method": "stx_transferStx", "params": { "sender": "SP3F7GQ48JY59521DZEE6KABHBF4Q33PEYJ823ZXQ", "recipient": "SP3F7GQ48JY59521DZEE6KABHBF4Q33PEYJ823ZXQ", "amount": "100000000000", "memo": "", "network": "mainnet" } } ``` #### Parameters | Parameter | Required? | Data Type | Description | | ----------- | --------- | --------- | ------------------------------------------------------------------- | | `sender` | Required | `string` | The stacks address of sender (required for multi-account scenarios) | | `recipient` | Required | `string` | Stacks address | | `amount` | Required | `string` | micro-STX (uSTX) | | `memo` | Optional | `string` | Memo string to be included with the transfer transaction | | `network` | Optional | `string` | "mainnet" \| "testnet" \| "devnet" | #### Response ```json theme={null} { "jsonrpc": "2.0", "id": 1, "result": { "txid": "1234567890abcdef1234567890abcdef12345678", "transaction": "0x…" } } ``` ### stx\_signTransaction Sign a Stacks transaction. Optional broadcast. #### Request ```json theme={null} { "id": 1, "jsonrpc": "2.0", "method": "stx_signTransaction", "params": { "transaction": "0x…", "broadcast": false, "network": "mainnet" } } ``` #### Parameters | Parameter | Required? | Data Type | Description | | ------------- | --------- | --------- | ---------------------------------- | | `transaction` | Required | `string` | hex transaction | | `broadcast` | Optional | `boolean` | default false | | `network` | Optional | `string` | "mainnet" \| "testnet" \| "devnet" | #### Response ```json theme={null} { "jsonrpc": "2.0", "id": 1, "result": { "signature": "0x…", "transaction": "0x…", "txid": "1234567890abcdef1234567890abcdef12345678" } } ``` **Note:** `txid` is present if broadcast=true ### stx\_signMessage Sign arbitrary message; supports structured (SIP-018). #### Request ```json theme={null} { "id": 1, "jsonrpc": "2.0", "method": "stx_signMessage", "params": { "address": "SP3F7GQ48JY59521DZEE6KABHBF4Q33PEYJ823ZXQ", "message": "message", "messageType": "utf8", "network": "mainnet", "domain": "example.com" } } ``` #### Parameters | Parameter | Required? | Data Type | Description | | ------------- | --------- | --------- | --------------------------------------------------------------------------------------------------------- | | `address` | Required | `string` | The stacks address of sender | | `message` | Required | `string` | Utf-8 string representing the message to be signed by the wallet | | `messageType` | Optional | `string` | Type of message for signing: `utf8` for basic string or `structured` for structured data | | `network` | Optional | `string` | Network for signing: `mainnet`, `testnet`, `signet`, `devnet` (note: redundant since chainId is provided) | | `domain` | Optional | `string` | Domain tuple per SIP-018 (for structured messages only) | #### Response ```json theme={null} { "jsonrpc": "2.0", "id": 1, "result": { "signature": "0x…" } } ``` ### stx\_signStructuredMessage Domain-bound structured signing (SIP-018). #### Request ```json theme={null} { "id": 1, "jsonrpc": "2.0", "method": "stx_signStructuredMessage", "params": { "message": "message", "domain": "domain" } } ``` #### Parameters | Parameter | Required? | Data Type | Description | | --------- | --------- | ------------------ | ----------------------------- | | `message` | Required | `string \| object` | message to be signed | | `domain` | Required | `string \| object` | domain for structured signing | #### Response ```json theme={null} { "jsonrpc": "2.0", "id": 1, "result": { "signature": "0x…", "publicKey": "0x04…" } } ``` **Note:** `publicKey` is optional ### stx\_callContract Wrapper method for `stx_signTransaction` that calls a Stacks contract. #### Request ```json theme={null} { "id": 1, "jsonrpc": "2.0", "method": "stx_callContract", "params": { "contract": "SP3F7GQ48JY59521DZEE6KABHBF4Q33PEYJ823ZXQ.my-contract", "functionName": "get-balance", "functionArgs": [] } } ``` #### Parameters | Parameter | Required? | Data Type | Description | | -------------- | --------- | ---------- | ------------------------------------------------------------------------------- | | `contract` | Required | `string` | Fully qualified contract identifier, including Stacks address and contract name | | `functionName` | Required | `string` | Name of the function to call | | `functionArgs` | Required | `string[]` | Arguments to pass to the contract function, encoded as strings | #### Response ```json theme={null} { "jsonrpc": "2.0", "id": 1, "result": { "txid": "stack_tx_id", "transaction": "raw_tx_hex" } } ``` * `txid` - is used to identify the transaction on the explorer * `transaction` - hex-encoded raw transaction ## Session Properties In a connection request, it is recommended to serialize the response to `stx_getAddresses` in `session.sessionProperties.stacks_getAddresses`. This allows dapps to consume an active session without requiring a context switch to re-request all addresses and associated public keys from the wallet. # Stellar Source: https://docs.walletconnect.com/wallets/chains/stellar Overview of the Stellar JSON-RPC methods supported by Wallet SDK. These are the methods that wallets should implement to handle Stellar transactions and messages via WalletConnect.
2. Install the wallet app
3. Sign up for an account with the wallet app
4. Create one or more accounts | 1. N/A
2. The app is installed
3. I have an account
4. I have one or more accounts | | **Connect to dapp via web browser** | 1. Open the Reown connection page [https://appkit-lab.reown.com/](https://appkit-lab.reown.com/) from a PC
2. Press on the “Connect Wallet” button and select the Reown option.
3. Open the wallet app and use the scan QR option to connect.
4. Accept on the wallet the connection request | 1. The app has been correctly set-up
2. A modal with wallet options is opened
3. A QR code is shown on the website and the wallet is able to scan it.
4. The connection is successfully established. The wallet data is now shown on the website. | | **Connect to dapp via mobile browser (Deep-link)** | 1. Open [https://appkit-lab.reown.com/](https://appkit-lab.reown.com/) in your mobile device.
2. Select one of the default options (e.g. Wagmi for EVM chains). Press the "Custom Wallet" button from the navbar. Fill in the wallet’s name and its deeplink (Mobile Link) in the “Add a Custom Wallet” form. Press “Add Wallet”. After the website reloads, press the “Connect Wallet” button and select the newly created wallet.
3. Accept the connection request in the wallet application. | 1. N/A
2. A form should show up on the website to fill in the wallet’s data. After the changes are applied, the modal should show the newly created wallet on the main view.
3. The user should be redirected to the wallet application and a modal with a connection request should show up on the wallet application. The wallet should connect successfully. On Android devices, the user should be redirected back to the website after accepting the connection request. | | **Switch chains - dapp side** | 1. Once the wallet is connected, press on the modal button on the top right of the website.
2. Press the first button of the modal to switch the chain.
3. Select any available chain, close the modal, and press the “Send Transaction” button | 1. A modal with the account information should pop up on the website.
2. A new view with supported chains should show up.
3. The transaction request that pops up on the wallet should show in their information the correct chain that was previously selected. | | **Switch Chains - wallet side (if supported)** | 1. Check if the wallet supports chain switching. If so, select a different chain from the connected one. | 1. The chain change should be reflected on the website. The first card shows the current chain ID. | | **Accounts Switching - wallet side** | 1. In the wallet app, switch from one account to another. | 1. The account switch event should be reflected in the modal’s account view on the website. | | **Disconnect a wallet** | 1. Select the "Disconnect" button from the Wallet App (Ideally, wallets should have a section where users can see all their existing dApp connections and manage/disconnect from dApps in one spot—this is not always true, so if not possible, just skip this).
2. Repeat the above steps and press the "Disconnect" button from the dApp (this should always be available). | 1. The related session should disappear from the dApp and the Wallet App.
2. The related session should disappear from the dApp and the Wallet App. | | **Verify API** | 1. Open [https://malicious-app-verify-simulation.vercel.app/](https://malicious-app-verify-simulation.vercel.app/)
2. Select a supported chain by the wallet (some wallets don’t support testnets) and press the “Connect” button.
3. Scan with the wallet the generated QR code. | 1. N/A
2. A modal should show up with a QR code to scan.
3. The connection request in the wallet should flag the website as malicious. | ### Chain Specific The following test cases only apply for wallets supporting a particular set of chains.
2. Press the “Sign Message” button.
3. Accept the signature request on the wallet. | 1. N/A
2. A modal should pop up on the wallet app requesting a signature.
3. Once accepted and signed, the hash should show up on the website. | | **Supporting eth\_signTypedData\_v4** | 1. Connect the wallet.
2. Press the “Sign Typed Data” button.
3. Accept the signature request on the wallet. | 1. N/A
2. A modal should pop up on the wallet app requesting a signature.
3. Once accepted and signed, the hash should show up on the website. | | **Supporting eth\_sendTransaction** | 1. Connect the wallet.
2. Press the “Send Transaction” button. | 1. N/A
2. A modal should pop up on the wallet app requesting a signature. |
2. Press the “Sign Message” button.
3. Accept the signature request on the wallet. | 1. N/A
2. A modal should pop up on the wallet app requesting a signature.
3. Once accepted and signed, the hash should show up on the website. | | **Supporting solana\_signTransaction** | 1. Connect the wallet to [AppKit Lab](https://appkit-lab.reown.com/library/solana)
2. Press the “Sign Transaction” button.
3. Accept the signature request on the wallet. | 1. N/A
2. A modal should pop up on the wallet app requesting a signature.
3. Once accepted and signed, the hash should show up on the website. | | **Supporting v0 Transactions** | 1. Connect the wallet to [AppKit Lab](https://appkit-lab.reown.com/library/solana)
2. Press the “Sign Versioned Transaction” button.
3. Accept the signature request on the wallet. | 1. N/A
2. A modal should pop up on the wallet app requesting a signature.
3. Once accepted and signed, the hash should show up on the website. |
For a debugging guide, visit the [Debugging Universal Links](https://developer.apple.com/documentation/technotes/tn3155-debugging-universal-links) page.
You can check our Flutter's Wallet SDK sample [AppDelegate file](https://github.com/reown-com/reown_flutter/blob/master/packages/reown_walletkit/example/ios/Runner/AppDelegate.swift) as a reference.
For enabling links to app content check [this](https://developer.android.com/training/app-links/deep-linking) documentation page.
For more information on how to interact with other apps using intents, see [Android Intent Documentation](https://developer.android.com/training/basics/intents). You can check our Flutter's Wallet SDK sample [MainActivity file](https://github.com/reown-com/reown_flutter/blob/master/packages/reown_walletkit/example/android/app/src/main/kotlin/com/example/wallet/MainActivity.kt) as a reference.
2. Install the wallet app
3. Sign up for an account with the wallet app
4. Create one or more accounts | 1. N/A
2. The app is installed
3. I have an account
4. I have one or more accounts | | **Connect to dapp via web browser** | 1. Open the Reown connection page [https://appkit-lab.reown.com/](https://appkit-lab.reown.com/) from a PC
2. Press on the “Connect Wallet” button and select the Reown option.
3. Open the wallet app and use the scan QR option to connect.
4. Accept on the wallet the connection request | 1. The app has been correctly set-up
2. A modal with wallet options is opened
3. A QR code is shown on the website and the wallet is able to scan it.
4. The connection is successfully established. The wallet data is now shown on the website. | | **Connect to dapp via mobile browser (Deep-link)** | 1. Open [https://appkit-lab.reown.com/](https://appkit-lab.reown.com/) in your mobile device.
2. Select one of the default options (e.g. Wagmi for EVM chains). Press the "Custom Wallet" button from the navbar. Fill in the wallet’s name and its deeplink (Mobile Link) in the “Add a Custom Wallet” form. Press “Add Wallet”. After the website reloads, press the “Connect Wallet” button and select the newly created wallet.
3. Accept the connection request in the wallet application. | 1. N/A
2. A form should show up on the website to fill in the wallet’s data. After the changes are applied, the modal should show the newly created wallet on the main view.
3. The user should be redirected to the wallet application and a modal with a connection request should show up on the wallet application. The wallet should connect successfully. On Android devices, the user should be redirected back to the website after accepting the connection request. | | **Switch chains - dapp side** | 1. Once the wallet is connected, press on the modal button on the top right of the website.
2. Press the first button of the modal to switch the chain.
3. Select any available chain, close the modal, and press the “Send Transaction” button | 1. A modal with the account information should pop up on the website.
2. A new view with supported chains should show up.
3. The transaction request that pops up on the wallet should show in their information the correct chain that was previously selected. | | **Switch Chains - wallet side (if supported)** | 1. Check if the wallet supports chain switching. If so, select a different chain from the connected one. | 1. The chain change should be reflected on the website. The first card shows the current chain ID. | | **Accounts Switching - wallet side** | 1. In the wallet app, switch from one account to another. | 1. The account switch event should be reflected in the modal’s account view on the website. | | **Disconnect a wallet** | 1. Select the "Disconnect" button from the Wallet App (Ideally, wallets should have a section where users can see all their existing dApp connections and manage/disconnect from dApps in one spot—this is not always true, so if not possible, just skip this).
2. Repeat the above steps and press the "Disconnect" button from the dApp (this should always be available). | 1. The related session should disappear from the dApp and the Wallet App.
2. The related session should disappear from the dApp and the Wallet App. | | **Verify API** | 1. Open [https://malicious-app-verify-simulation.vercel.app/](https://malicious-app-verify-simulation.vercel.app/)
2. Select a supported chain by the wallet (some wallets don’t support testnets) and press the “Connect” button.
3. Scan with the wallet the generated QR code. | 1. N/A
2. A modal should show up with a QR code to scan.
3. The connection request in the wallet should flag the website as malicious. | ### Chain Specific The following test cases only apply for wallets supporting a particular set of chains.
2. Press the “Sign Message” button.
3. Accept the signature request on the wallet. | 1. N/A
2. A modal should pop up on the wallet app requesting a signature.
3. Once accepted and signed, the hash should show up on the website. | | **Supporting eth\_signTypedData\_v4** | 1. Connect the wallet.
2. Press the “Sign Typed Data” button.
3. Accept the signature request on the wallet. | 1. N/A
2. A modal should pop up on the wallet app requesting a signature.
3. Once accepted and signed, the hash should show up on the website. | | **Supporting eth\_sendTransaction** | 1. Connect the wallet.
2. Press the “Send Transaction” button. | 1. N/A
2. A modal should pop up on the wallet app requesting a signature. |
2. Press the “Sign Message” button.
3. Accept the signature request on the wallet. | 1. N/A
2. A modal should pop up on the wallet app requesting a signature.
3. Once accepted and signed, the hash should show up on the website. | | **Supporting solana\_signTransaction** | 1. Connect the wallet to [AppKit Lab](https://appkit-lab.reown.com/library/solana)
2. Press the “Sign Transaction” button.
3. Accept the signature request on the wallet. | 1. N/A
2. A modal should pop up on the wallet app requesting a signature.
3. Once accepted and signed, the hash should show up on the website. | | **Supporting v0 Transactions** | 1. Connect the wallet to [AppKit Lab](https://appkit-lab.reown.com/library/solana)
2. Press the “Sign Versioned Transaction” button.
3. Accept the signature request on the wallet. | 1. N/A
2. A modal should pop up on the wallet app requesting a signature.
3. Once accepted and signed, the hash should show up on the website. |
This avoids an asynchronous call to retrieve the internal block number which Ethers uses to resolve a complete [`TransactionResponse`](https://docs.ethers.io/v5/api/providers/types/#providers-TransactionResponse) object.
Note that as a result of this optimization, `sendUncheckedTransaction` returns a mock transaction response that only contains the `hash` property and a `wait` method. All other properties are `null`. 2. **The transaction's `to` property should be a plain address rather than an ENS name**
This avoids an asynchronous call to automatically resolve ENS names during the send process.
If you still want to support ENS name resolution, you should manually run [`provider.resolveName`](https://docs.ethers.io/v5/api/providers/provider/#Provider-ResolveName) ahead of time, storing the result before the user attempts to send a transaction. Do not resolve ENS names in the event handler. 3. **The transaction's `gasLimit` property should be set**
This avoids the asynchronous work performed in `sendTransaction` which automatically estimates the gas limit if it's missing.
If you still want to use the same gas limit estimation logic from `sendTransaction`, you should manually run [`provider.estimateGas`](https://docs.ethers.io/v5/api/providers/provider/#Provider-estimateGas) ahead of time, storing the result before the user attempts to send the transaction. Do not estimate gas in the event handler. ### When calling a write method on a contract 1. **[`contract.METHOD_NAME`](https://docs.ethers.io/v5/api/contract/contract/#contract-functionsSend) should be avoided if favor of calling [`contract.populateTransaction.METHOD_NAME`](https://docs.ethers.io/v5/api/contract/contract/#contract-populateTransaction) ahead of time, then sending the populated transaction with [`signer.sendUncheckedTransaction`](https://docs.ethers.io/v5/api/providers/jsonrpc-provider/#JsonRpcSigner-sendUncheckedTransaction).** 2. When sending the populated transaction, you should [follow the same guidelines as regular transactions](#when-sending-a-transaction) to avoid any asynchronous logic breaking the app link navigation. Do not populate the contract transaction in the event handler. ### When signing a message If the message depends on the result of an asynchronous call (e.g. retrieving a nonce when implementing [Sign-In With Ethereum](https://login.xyz)), you should do this work ahead of time, storing the result before the user attempts to sign the message. Do not perform this asynchronous work in the event handler. # One-click Auth Source: https://docs.walletconnect.com/wallets/ios/one-click-auth ## Introduction This section outlines an innovative protocol method that facilitates the initiation of a Sign session and the authentication of a wallet through a [Sign-In with Ethereum](https://eips.ethereum.org/EIPS/eip-4361) (SIWE) message, enhanced by [ReCaps](https://eips.ethereum.org/EIPS/eip-5573) (ReCap Capabilities). This enhancement not only offers immediate authentication for dApps, paving the way for prompt user logins, but also integrates informed consent for authorization. Through this mechanism, dApps can request the delegation of specific capabilities to perform actions on behalf of the wallet user. These capabilities, encapsulated within SIWE messages as ReCap URIs, detail the scope of actions authorized by the user in an explicit and human-readable form. By incorporating ReCaps, this method extends the utility of SIWE messages, allowing dApps to combine authentication with a nuanced authorization model. This model specifies the actions a dApp is authorized to execute on the user's behalf, enhancing security and user autonomy by providing clear consent for each delegated capability. As a result, dApps can utilize these consent-backed messages to perform predetermined actions, significantly enriching the interaction between dApps, wallets, and users within the Ethereum ecosystem. 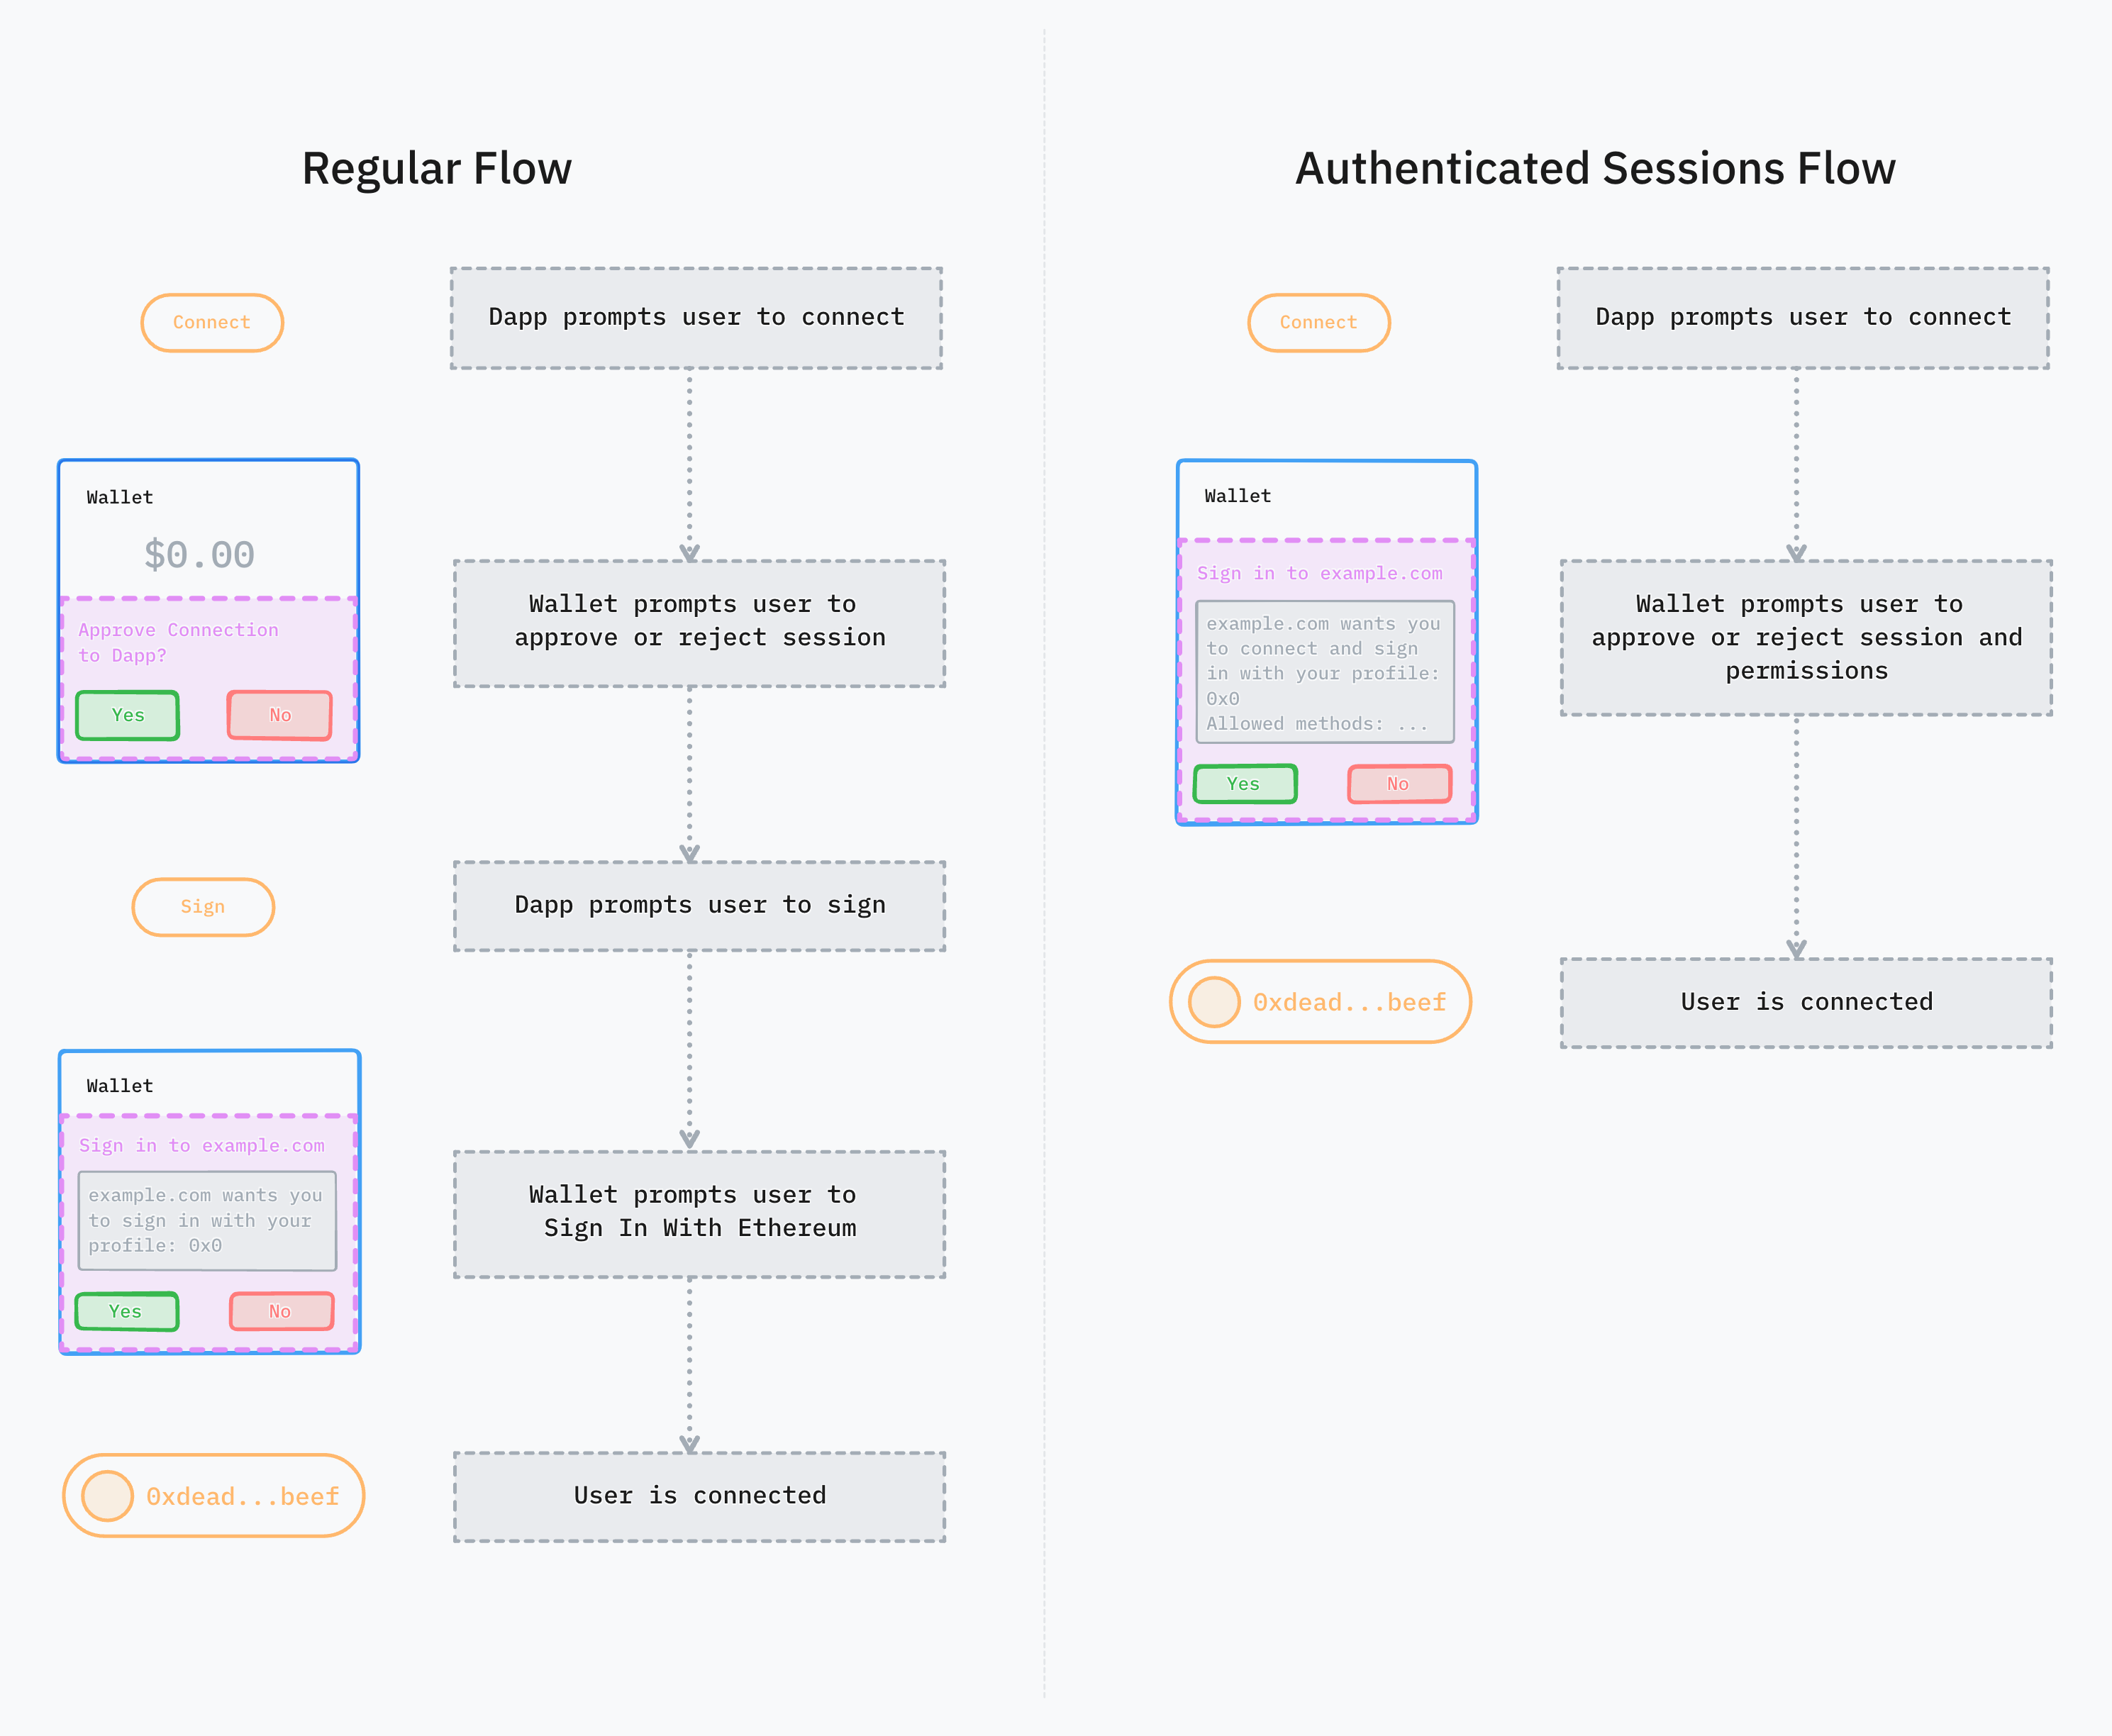 ## Handling Authentication Requests To handle incoming authentication requests, subscribe to the authenticateRequestPublisher. This will notify you of any authentication requests that need to be processed, allowing you to either approve or reject them based on your application logic. ```swift theme={null} WalletKit.instance.authenticateRequestPublisher .receive(on: DispatchQueue.main) .sink { result in // Process the authentication request here. // This involves displaying UI to the user. } .store(in: &subscriptions) // Assuming `subscriptions` is where you store your Combine subscriptions. ``` ## Authentication Objects/Payloads To interact with authentication requests, first build authentication objects (AuthObject). These objects are crucial for approving authentication requests. This involves: * **Creating an Authentication Payload** - Generate an authentication payload that matches your application's supported chains and methods. * **Formatting Authentication Messages** - Format the authentication message using the payload and the user's account. * **Signing the Authentication Message** - Sign the formatted message to create a verifiable authentication object. Example Implementation: ```swift theme={null} func buildAuthObjects(request: AuthenticationRequest, account: Account, privateKey: String) throws -> [AuthObject] { let requestedChains = Set(request.payload.chains.compactMap { Blockchain($0) }) let supportedChains: Set
2. Install the wallet app
3. Sign up for an account with the wallet app
4. Create one or more accounts | 1. N/A
2. The app is installed
3. I have an account
4. I have one or more accounts | | **Connect to dapp via web browser** | 1. Open the Reown connection page [https://appkit-lab.reown.com/](https://appkit-lab.reown.com/) from a PC
2. Press on the “Connect Wallet” button and select the Reown option.
3. Open the wallet app and use the scan QR option to connect.
4. Accept on the wallet the connection request | 1. The app has been correctly set-up
2. A modal with wallet options is opened
3. A QR code is shown on the website and the wallet is able to scan it.
4. The connection is successfully established. The wallet data is now shown on the website. | | **Connect to dapp via mobile browser (Deep-link)** | 1. Open [https://appkit-lab.reown.com/](https://appkit-lab.reown.com/) in your mobile device.
2. Select one of the default options (e.g. Wagmi for EVM chains). Press the "Custom Wallet" button from the navbar. Fill in the wallet’s name and its deeplink (Mobile Link) in the “Add a Custom Wallet” form. Press “Add Wallet”. After the website reloads, press the “Connect Wallet” button and select the newly created wallet.
3. Accept the connection request in the wallet application. | 1. N/A
2. A form should show up on the website to fill in the wallet’s data. After the changes are applied, the modal should show the newly created wallet on the main view.
3. The user should be redirected to the wallet application and a modal with a connection request should show up on the wallet application. The wallet should connect successfully. On Android devices, the user should be redirected back to the website after accepting the connection request. | | **Switch chains - dapp side** | 1. Once the wallet is connected, press on the modal button on the top right of the website.
2. Press the first button of the modal to switch the chain.
3. Select any available chain, close the modal, and press the “Send Transaction” button | 1. A modal with the account information should pop up on the website.
2. A new view with supported chains should show up.
3. The transaction request that pops up on the wallet should show in their information the correct chain that was previously selected. | | **Switch Chains - wallet side (if supported)** | 1. Check if the wallet supports chain switching. If so, select a different chain from the connected one. | 1. The chain change should be reflected on the website. The first card shows the current chain ID. | | **Accounts Switching - wallet side** | 1. In the wallet app, switch from one account to another. | 1. The account switch event should be reflected in the modal’s account view on the website. | | **Disconnect a wallet** | 1. Select the "Disconnect" button from the Wallet App (Ideally, wallets should have a section where users can see all their existing dApp connections and manage/disconnect from dApps in one spot—this is not always true, so if not possible, just skip this).
2. Repeat the above steps and press the "Disconnect" button from the dApp (this should always be available). | 1. The related session should disappear from the dApp and the Wallet App.
2. The related session should disappear from the dApp and the Wallet App. | | **Verify API** | 1. Open [https://malicious-app-verify-simulation.vercel.app/](https://malicious-app-verify-simulation.vercel.app/)
2. Select a supported chain by the wallet (some wallets don’t support testnets) and press the “Connect” button.
3. Scan with the wallet the generated QR code. | 1. N/A
2. A modal should show up with a QR code to scan.
3. The connection request in the wallet should flag the website as malicious. | ### Chain Specific The following test cases only apply for wallets supporting a particular set of chains.
2. Press the “Sign Message” button.
3. Accept the signature request on the wallet. | 1. N/A
2. A modal should pop up on the wallet app requesting a signature.
3. Once accepted and signed, the hash should show up on the website. | | **Supporting eth\_signTypedData\_v4** | 1. Connect the wallet.
2. Press the “Sign Typed Data” button.
3. Accept the signature request on the wallet. | 1. N/A
2. A modal should pop up on the wallet app requesting a signature.
3. Once accepted and signed, the hash should show up on the website. | | **Supporting eth\_sendTransaction** | 1. Connect the wallet.
2. Press the “Send Transaction” button. | 1. N/A
2. A modal should pop up on the wallet app requesting a signature. |
2. Press the “Sign Message” button.
3. Accept the signature request on the wallet. | 1. N/A
2. A modal should pop up on the wallet app requesting a signature.
3. Once accepted and signed, the hash should show up on the website. | | **Supporting solana\_signTransaction** | 1. Connect the wallet to [AppKit Lab](https://appkit-lab.reown.com/library/solana)
2. Press the “Sign Transaction” button.
3. Accept the signature request on the wallet. | 1. N/A
2. A modal should pop up on the wallet app requesting a signature.
3. Once accepted and signed, the hash should show up on the website. | | **Supporting v0 Transactions** | 1. Connect the wallet to [AppKit Lab](https://appkit-lab.reown.com/library/solana)
2. Press the “Sign Versioned Transaction” button.
3. Accept the signature request on the wallet. | 1. N/A
2. A modal should pop up on the wallet app requesting a signature.
3. Once accepted and signed, the hash should show up on the website. |
After following the steps provided in the official guide: 1. Ensure that you handle incoming Universal Links in the your `AppDelegate.mm` file. ```swift theme={null} #import
For testing the configured universal link to app content check [this](https://developer.android.com/training/app-links/deep-linking#testing-filters) documentation page.
(e.g. `?chains=eip155:1,eip155:137`) | | platforms | | Returns listings that support at least one of the provided platforms
(e.g. `?platforms=ios,android,mac,injected`) | | sdks | | Returns listings that support at least one of the provided Reown SDKs
(e.g. `?sdks=sign_v1,sign_v2,auth_v1`) | | standards | | Returns listings that support at least one of the provided standards
(e.g. `?standards=eip-712,eip-3085`) | | ~~version~~ | | Deprecated - replaced by `sdks` param. Specifies supported Sign version (1 or 2) | #### `GET /v3/wallets` Returns a JSON object containing all wallets listed in the cloud explorer. Examples: * `GET https://explorer-api.walletconnect.com/v3/wallets?projectId=YOUR_PROJECT_ID&entries=5&page=1` (will return the first 5 wallets from the first page) * `GET https://explorer-api.walletconnect.com/v3/wallets?projectId=YOUR_PROJECT_ID&platforms=injected` (will only return injected wallets) #### `GET /v3/dapps` Returns a JSON object containing all dApps listed in the public cloud explorer. Examples: * `GET https://explorer-api.walletconnect.com/v3/dapps?projectId=YOUR_PROJECT_ID&entries=5&page=1` #### `GET /v3/hybrid` Returns a JSON object containing all hybrids listed in the public cloud explorer. Examples: * `GET https://explorer-api.walletconnect.com/v3/hybrid?projectId=YOUR_PROJECT_ID&entries=5&page=1` #### `GET /v3/all` Returns a JSON object containing all entries listed in the public cloud explorer. Examples: * `GET https://explorer-api.walletconnect.com/v3/all?projectId=YOUR_PROJECT_ID&entries=5&page=1` #### `GET /v3/all?projectId=YOUR_PROJECT_ID&ids=LISTING_ID1,LISTING_ID2` Returns a JSON object containing the entry listings by ID, which can be useful for allowlisting purposes.
You can find and copy listing ids from our [WalletGuide](https://walletguide.walletconnect.network/) Examples: * `GET https://explorer-api.walletconnect.com/v3/all?projectId=YOUR_PROJECT_ID&ids=be49f0a78d6ea1beed3804c3a6b62ea71f568d58d9df8097f3d61c7c9baf273d,4622a2b2d6af1c9844944291e5e7351a6aa24cd7b23099efac1b2fd875da31a0` ### Chains By default chains endpoint returns all chains registered under [CASA Namespace](https://github.com/ChainAgnostic/CASA) and that were approved by our Network Partnerships team. To add a new chain, fill out the application form linked on our [chains and foundations landing page](https://walletconnect.com/solutions/chains-and-foundations). #### Query Parameters You can use following query params to query chains by its namespace and exclude testnets: | Param | Description | | ---------- | ----------------------------------------------------------------------------------------------------------------------------- | | testnets | Determines if testnets should be included in the response
(e.g. `?testnets=false`, defaults to `true` if not provided) | | namespaces | Returns chains that belong to one of the provided namespaces
(e.g. `?namespaces=eip155,cosmos,solana`) | #### `GET /v3/chains` Returns all chains registered under [CASA Namespace](https://github.com/ChainAgnostic/CASA) and that were approved by our Network Partnerships team. To add a new chain, fill out the application form linked on our [chains and foundations landing page](https://walletconnect.com/solutions/chains-and-foundations). Examples: * `GET https://explorer-api.walletconnect.com/v3/chains?projectId=YOUR_PROJECT_ID` * `GET https://explorer-api.walletconnect.com/v3/chains?projectId=YOUR_PROJECT_ID&testnets=false` * `GET https://explorer-api.walletconnect.com/v3/chains?projectId=YOUR_PROJECT_ID&namespaces=eip155,cosmos` ### Logos #### Path Parameters | Param | Description | | ----- | ---------------------------------------------------------------------------------------- | | size | Determines resolution of returned image can be one of: `sm`, `md` or `lg` | | id | Corresponds to a Cloud Explorer entry's `image_id` field as returned by the Listings API | #### Query Parameters | Param | Required? | Description | | --------- | --------- | ------------------------------------------------------------------------------------------------------------------ | | projectId | Required | Your WalletConnect Dashboard Project ID (from [dashboard.walletconnect.com](https://dashboard.walletconnect.com/)) | #### `GET /v3/logo/:size/:image_id` Returns the image source of the logo for `image_id` sized according `size`. Examples: * `GET https://explorer-api.walletconnect.com/v3/logo/md/32a77b79-ffe8-42c3-61a7-3e02e019ca00?projectId=YOUR_PROJECT_ID` # Chain Onboarding Source: https://docs.walletconnect.com/wallets/walletguide/submit-chain The WalletConnect protocol is multi-chain by design. By using the [CAIP-25 standard](https://github.com/ChainAgnostic/CAIPs/blob/master/CAIPs/caip-25.md), WalletConnect aims to provide a standardized process for onboarding new chains into our ecosystem. To get started, follow the following steps. ## Register Chain with the Explorer
2. Install the wallet app
3. Sign up for an account
4. Create one or more accounts | 1. N/A
2. The app is installed
3. I have an account
4. I have one or more accounts | | **Connect to dapp via web browser** | 1. Open the Reown connection page [appkit-lab.reown.com](https://appkit-lab.reown.com/) from a PC
2. Press "Connect Wallet" and select Reown.
3. Open the wallet app and scan QR code.
4. Accept the connection request. | 1. The app is set up correctly
2. A modal with wallet options appears
3. A QR code is shown and scanned
4. Connection established, wallet data displayed on site | | **Connect to dapp via mobile browser (Deep-link)** | 1. Open [appkit-lab.reown.com](https://appkit-lab.reown.com/) on mobile.
2. Select a default option (e.g., Wagmi for EVM chains), click "Custom Wallet," enter wallet name and deep link, then add it. Press "Connect Wallet" and select the new wallet.
3. Accept connection request in the wallet app. | 1. N/A
2. A form appears to enter wallet data, new wallet option is visible.
3. User is redirected to the wallet app, sees a connection request, and successfully connects. On Android, user is redirected back to the website. | | **Switch chains - dapp side** | 1. After connecting, click the modal button (top right of website).
2. Click the first button in the modal to switch chains.
3. Select a chain, close the modal, and press "Send Transaction." | 1. Modal with account info appears.
2. A new view with supported chains appears.
3. The transaction request in the wallet shows the correct chain. | | **Switch Chains - wallet side (if supported)** | 1. Check if wallet supports chain switching. If so, switch to a different chain. | 1. The chain change is reflected on the website. The first card displays the current chain ID. | | **Accounts Switching - wallet side** | 1. Switch accounts in the wallet app. | 1. The account switch is reflected in the modal’s account view on the website. | | **Disconnect a wallet** | 1. Press "Disconnect" in the Wallet App (if available).
2. Alternatively, press "Disconnect" from the dApp. | 1. The session disappears from both the dApp and Wallet App.
2. The session disappears from both the dApp and Wallet App. | | **Verify API** | 1. Open [malicious-app-verify-simulation.vercel.app](https://malicious-app-verify-simulation.vercel.app/).
2. Select a wallet-supported chain, press "Connect."
3. Scan the QR code with the wallet. | 1. N/A
2. A QR code modal appears.
3. The wallet flags the site as malicious. | ### Chain Specific The following test cases only apply for wallets supporting a particular set of chains.
2. Press the “Sign Message” button.
3. Accept the signature request on the wallet. | 1. N/A
2. A modal should popup on the wallet app requesting a signature.
3. Once accepted and signed, the hash should show up on the website. | | **Supporting eth\_signTypedData\_v4** | 1. Connect the wallet.
2. Press the “Sign Typed Data” button.
3. Accept the signature request on the wallet. | 1. N/A
2. A modal should popup on the wallet app requesting a signature.
3. Once accepted and signed, the hash should show up on the website. | | **Supporting eth\_sendTransaction** | 1. Connect the wallet.
2. Press the “Send Transaction” button. | 1. N/A
2. A modal should popup on the wallet app requesting a signature. |
2. Press the "Sign Message" button.
3. Accept the signature request on the wallet. | 1. N/A.
2. A modal should pop up on the wallet app requesting a signature.
3. Once accepted and signed, the hash should show up on the website. | | **Supporting solana\_signTransaction** | 1. Connect the wallet to [appkit-lab.reown.com/appkit/?name=solana](https://appkit-lab.reown.com/appkit/?name=solana).
2. Press the "Sign Transaction" button.
3. Accept the signature request on the wallet. | 1. N/A.
2. A modal should pop up on the wallet app requesting a signature.
3. Once accepted and signed, the hash should show up on the website. | | **Supporting v0 Transactions** | 1. Connect the wallet to [appkit-lab.reown.com/appkit/?name=solana](https://appkit-lab.reown.com/appkit/?name=solana).
2. Press the "Sign Versioned Transaction" button.
3. Accept the signature request on the wallet. | 1. N/A.
2. A modal should pop up on the wallet app requesting a signature.
3. Once accepted and signed, the hash should show up on the website. |
2. Install the wallet app
3. Sign up for an account with the wallet app
4. Create one or more accounts | 1. N/A
2. The app is installed
3. I have an account
4. I have one or more accounts | | **Connect to dapp via web browser** | 1. Open the Reown connection page [https://appkit-lab.reown.com/](https://appkit-lab.reown.com/) from a PC
2. Press on the “Connect Wallet” button and select the Reown option.
3. Open the wallet app and use the scan QR option to connect.
4. Accept on the wallet the connection request | 1. The app has been correctly set-up
2. A modal with wallet options is opened
3. A QR code is shown on the website and the wallet is able to scan it.
4. The connection is successfully established. The wallet data is now shown on the website. | | **Connect to dapp via mobile browser (Deep-link)** | 1. Open [https://appkit-lab.reown.com/](https://appkit-lab.reown.com/) in your mobile device.
2. Select one of the default options (e.g. Wagmi for EVM chains). Press the "Custom Wallet" button from the navbar. Fill in the wallet’s name and its deeplink (Mobile Link) in the “Add a Custom Wallet” form. Press “Add Wallet”. After the website reloads, press the “Connect Wallet” button and select the newly created wallet.
3. Accept the connection request in the wallet application. | 1. N/A
2. A form should show up on the website to fill in the wallet’s data. After the changes are applied, the modal should show the newly created wallet on the main view.
3. The user should be redirected to the wallet application and a modal with a connection request should show up on the wallet application. The wallet should connect successfully. On Android devices, the user should be redirected back to the website after accepting the connection request. | | **Switch chains - dapp side** | 1. Once the wallet is connected, press on the modal button on the top right of the website.
2. Press the first button of the modal to switch the chain.
3. Select any available chain, close the modal, and press the “Send Transaction” button | 1. A modal with the account information should pop up on the website.
2. A new view with supported chains should show up.
3. The transaction request that pops up on the wallet should show in their information the correct chain that was previously selected. | | **Switch Chains - wallet side (if supported)** | 1. Check if the wallet supports chain switching. If so, select a different chain from the connected one. | 1. The chain change should be reflected on the website. The first card shows the current chain ID. | | **Accounts Switching - wallet side** | 1. In the wallet app, switch from one account to another. | 1. The account switch event should be reflected in the modal’s account view on the website. | | **Disconnect a wallet** | 1. Select the "Disconnect" button from the Wallet App (Ideally, wallets should have a section where users can see all their existing dApp connections and manage/disconnect from dApps in one spot—this is not always true, so if not possible, just skip this).
2. Repeat the above steps and press the "Disconnect" button from the dApp (this should always be available). | 1. The related session should disappear from the dApp and the Wallet App.
2. The related session should disappear from the dApp and the Wallet App. | | **Verify API** | 1. Open [https://malicious-app-verify-simulation.vercel.app/](https://malicious-app-verify-simulation.vercel.app/)
2. Select a supported chain by the wallet (some wallets don’t support testnets) and press the “Connect” button.
3. Scan with the wallet the generated QR code. | 1. N/A
2. A modal should show up with a QR code to scan.
3. The connection request in the wallet should flag the website as malicious. | ### Chain Specific The following test cases only apply for wallets supporting a particular set of chains.
2. Press the “Sign Message” button.
3. Accept the signature request on the wallet. | 1. N/A
2. A modal should pop up on the wallet app requesting a signature.
3. Once accepted and signed, the hash should show up on the website. | | **Supporting eth\_signTypedData\_v4** | 1. Connect the wallet.
2. Press the “Sign Typed Data” button.
3. Accept the signature request on the wallet. | 1. N/A
2. A modal should pop up on the wallet app requesting a signature.
3. Once accepted and signed, the hash should show up on the website. | | **Supporting eth\_sendTransaction** | 1. Connect the wallet.
2. Press the “Send Transaction” button. | 1. N/A
2. A modal should pop up on the wallet app requesting a signature. |
2. Press the “Sign Message” button.
3. Accept the signature request on the wallet. | 1. N/A
2. A modal should pop up on the wallet app requesting a signature.
3. Once accepted and signed, the hash should show up on the website. | | **Supporting solana\_signTransaction** | 1. Connect the wallet to [AppKit Lab](https://appkit-lab.reown.com/library/solana)
2. Press the “Sign Transaction” button.
3. Accept the signature request on the wallet. | 1. N/A
2. A modal should pop up on the wallet app requesting a signature.
3. Once accepted and signed, the hash should show up on the website. | | **Supporting v0 Transactions** | 1. Connect the wallet to [AppKit Lab](https://appkit-lab.reown.com/library/solana)
2. Press the “Sign Versioned Transaction” button.
3. Accept the signature request on the wallet. | 1. N/A
2. A modal should pop up on the wallet app requesting a signature.
3. Once accepted and signed, the hash should show up on the website. |
| Package | Description |
|---|---|
@walletconnect/pay-cli
|
Create and complete WalletConnect Pay payments from the terminal |
@walletconnect/cli-sdk
|
Wallet connection, signing, and cross-chain swidge for terminal apps |
@walletconnect/staking-cli
|
WCT staking on Optimism — stake, unstake, claim rewards |
selects payment option,
and signs the transaction alt Payment succeeds BX->>MF: Redirect to successUrl?payment_id={paymentId} else Payment fails BX->>MF: Redirect to errorUrl?payment_id={paymentId} end MF->>MB: Verify payment status MB->>API: GET /v1/merchant/payment/{paymentId}/status API-->>MB: { status: "succeeded" } MB-->>MF: Order confirmed MF->>B: Show order confirmation ``` ## Integration Steps
Logos and brands shown are for illustrative purposes only and do not imply affiliation or endorsement.
### Buyer checkout On the WalletConnect Pay buyer checkout page (opened when a buyer scans the payment QR with a generic camera or QR scanner), the merchant logo anchors the "Pay X to \Logos and brands shown are for illustrative purposes only and do not imply affiliation or endorsement.
Because the logo renders inside different container shapes across surfaces (square cards on web, rounded squares in wallets), the asset needs to work across all of them. The specification below is designed for that. ## Specification | Field | Value | | ---------------------- | --------------------------- | | Aspect ratio | 1:1 (square), ±5% tolerance | | Minimum dimensions | 500 × 500 px | | Recommended dimensions | 1024 × 1024 px | | Maximum dimensions | 4096 × 4096 px | | Accepted formats | JPEG, PNG, WebP, AVIF | | Max file size | 2 MB | | Transparency | Allowed in PNG and WebP | ### Format guidance * **PNG** or **WebP** for logos with transparent backgrounds. * **JPEG** for flat photographic logos with no transparency. * **AVIF** if your asset pipeline already produces it; otherwise prefer PNG. * **1024 × 1024 px** is the recommended size: it gives retina headroom across surfaces while staying well under the 2 MB cap. ### Why square Logos render inside square and rounded-square containers across surfaces. Non-square images get center-cropped, and the result is unpredictable: a tall rectangle that looks fine in one wallet may have its bottom half clipped in another. Square assets with the ±5% tolerance render consistently everywhere. Create a merchant with a logo hosted on your own CDN: ```http theme={null} POST /v1/merchants HTTP/1.1 Host: api.pay.walletconnect.com Authorization: Bearer
WalletConnect Pay
WalletConnect Pay is a complete, end-to-end stablecoin and crypto payment solution that allows PSPs and merchants to enable crypto payments from any wallet and any asset through a single, familiar integration. Choose your integration method below to quickstart.
Learn more about WalletConnect Pay and the wider WalletConnect brand.
your UI, branding, routing"] React["@walletconnect/pay-react
usePaymentSession"] State["@walletconnect/pay-state
payment runtime"] Host -->|consumes| React React -->|drives| State State -->|reaches the outside world
only through seams| Seams subgraph Seams["Injectable seams"] direction LR Transport["Transport"] Wallet["WalletProvider"] Signer["Signer"] Clock["Clock"] Telemetry["Telemetry"] end Transport --> T2["your server → WCP API"] Wallet --> W2["AppKit / your wallet"] Signer --> S2["signing strategy"] Clock --> C2["timers / polling"] Telemetry --> A2["analytics"] ``` The five seams the runtime depends on: | Seam | What it abstracts | Provided by | | ---------------- | ------------------------------------------ | ------------------------------------------------------------------------------------------------------------------------------------------- | | `Transport` | WCP HTTP calls | `pay-core` `createHttpTransport` → your server route | | `WalletProvider` | connect / accounts / provider / switch | `pay-appkit`, or your own wallet integration | | `Signer` | sign a payment option's wallet-RPC actions | `pay-appkit` `createAppKitSigner` — one call (wraps `pay-state`'s signing; drop to its raw strategies only for a custom, non-AppKit wallet) | | `Clock` | intervals + page visibility (for polling) | browser timers (the SDK ships a default) | | `Telemetry` | analytics breadcrumbs | your analytics pipeline (optional) |
Transport seam
(no secret)"] Server["Your server route
createEngineClient
(holds the API key)"] Wcp["WalletConnect Pay
API"] Browser -->|"fetch /api/wcp/payment/:id/*"| Server Server -->|"Api-Key header"| Wcp ``` `pay-core` exposes two entry points for exactly this: `createHttpTransport` for the browser (talks to *your* server) and `createEngineClient` (imported from `@walletconnect/pay-core/server`) which holds the API key and talks to WCP. In a Next.js app, your Route Handler sits in the middle. ## Next steps
{/* render per snapshot.state — see Step 5 */}
}
```
```typescript JavaScript — main.ts theme={null}
import { createHttpTransport } from '@walletconnect/pay-core'
import { createAppKitSigner, createAppKitWalletList } from '@walletconnect/pay-appkit'
import { browserClock, createPaymentController } from '@walletconnect/pay-state'
import { appKit } from './appkit'
// The framework-neutral wallet-list controller: list / search / paginate / QR URI /
// connect — and `walletList.wallet`, the seam the runtime drives.
const walletList = createAppKitWalletList(appKit, {
wcPayUrl: window.location.href
})
const wallet = walletList.wallet
const controller = createPaymentController({
paymentId,
wallet,
seams: {
transport: createHttpTransport({ baseUrl: '/api/wcp' }),
clock: browserClock,
signer: createAppKitSigner(wallet)
}
})
controller.subscribe(() => render(controller.getSnapshot()))
controller.start()
```
| Package | Role | Depends on |
|---|---|---|
@walletconnect/pay-core
|
WCP API client — contract types, CAIP utilities, the browser Transport seam (createHttpTransport), and the server-side createEngineClient that holds your API key. The foundation. |
— |
@walletconnect/pay-state
|
The headless runtime — the payment state machine, orchestration, the injectable seam contracts, the session factory, and the public PaymentSnapshot view-model. No React, no HTTP client, no wallet SDK. |
pay-core |
@walletconnect/pay-react
|
Thin React binding — usePaymentSession returns the snapshot plus domain actions. Zero state-machine leak. |
pay-state |
@walletconnect/pay-appkit
|
Reown AppKit adapter — implements the WalletProvider seam over a Reown AppKit instance (plus the Solana web3 loader). A /react subpath ships the wallet-connection hook. |
pay-state |
(no on-chain execution)"] end subgraph live ["Live mode"] LK["wcp_… key"] --> LP["Live payment"] LP --> LS["Real on-chain settlement"] end API["Same API
api.pay.walletconnect.com"] --> TK API --> LK style test fill:#F5F3FF,stroke:#7C3AED,color:#5B21B6 style TK fill:#EDE9FE,stroke:#7C3AED,color:#5B21B6 style TP fill:#EDE9FE,stroke:#7C3AED,color:#5B21B6 style TS fill:#EDE9FE,stroke:#7C3AED,color:#5B21B6 ``` Both modes use the **same API, the same base URL, and the same endpoints**. Nothing about your code changes between test and live except the key. | | Test mode | Live mode | | ---------------------- | ----------------------------------- | ---------------------------------------- | | **API key prefix** | `wcp_test_` | `wcp_` | | **Base URL** | `https://api.pay.walletconnect.com` | `https://api.pay.walletconnect.com` | | **On-chain execution** | None — settlement is simulated | Real transactions | | **Transaction hash** | Synthetic (`test:{paymentId}`) | Real on-chain hash | | **Payment limit** | None | Pilot limit until your account goes live | | **Data** | Fully separate from live data | Fully separate from test data | ## Test API keys Test keys are created in the [dashboard](https://merchant.pay.walletconnect.com/en/api-keys), alongside live keys. You can tell them apart by the prefix: test keys always start with `wcp_test_`. ```bash theme={null} export WCP_API_KEY="wcp_test_…" # test key — safe to experiment with export WCP_BASE="https://api.pay.walletconnect.com" ``` Merchants, settlement configurations, and payments created with a test key exist only in test mode. They are never visible to live requests, and vice versa.